FAQs / Guide
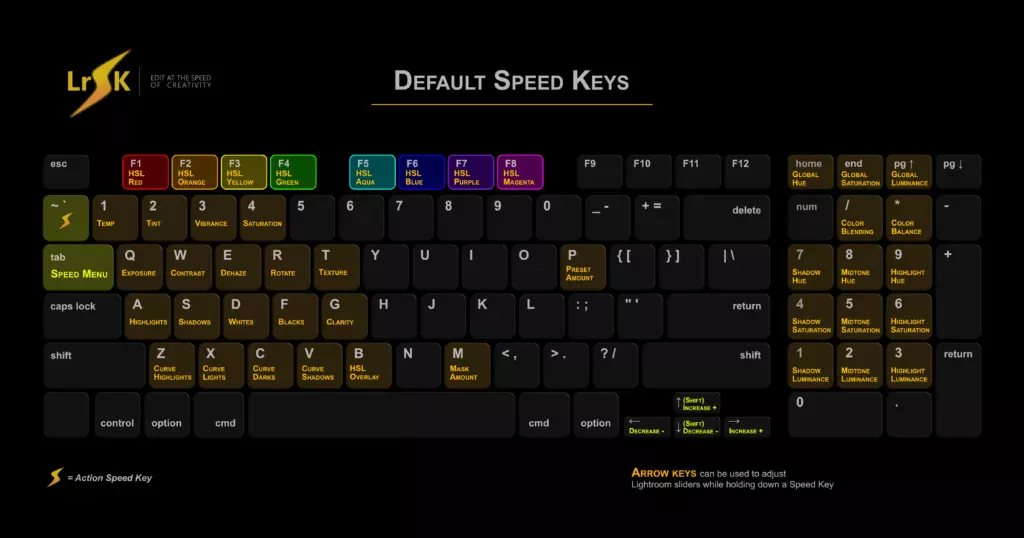
*What is a Speed Key?
A Speed Key is a designated key on your keyboard that is linked to a Lightroom slider. When pressed, it allows you to adjust the assigned slider using various methods:
- Mouse Wheel: Scroll up to increase or scroll down to decrease the slider.
- Arrow Keys: Use left and right for standard adjustments, and up and down for alternate shift changes.
- Mouse Drag: Left-click and drag the mouse left/right or up/down.
- Mouse Cursor: Move the cursor left/right or up/down.
- Trackpad: Slide your finger left/right or up/down.
This functionality enhances your workflow by providing multiple intuitive ways to control Lightroom sliders efficiently.
For example to increase the exposure…
Simply press and hold “Q” then scroll the mouse wheel up or use any of the methods mentioned above.
Can I assign a Speed Key to an existing Lightroom keyboard shortcut?
Speed Keys integrate seamlessly with Lightroom, allowing for enhanced functionality. Both a Speed Key and a Lightroom keyboard shortcut can be assigned to the same key, and both will operate as expected.
When you tap the Speed Key, it activates the Lightroom keyboard shortcut as usual. However, pressing and holding the Speed Key activates its unique function.
For instance, the “Q” key is assigned to the Spot Removal tool, tapping “Q” will activate the Spot Removal tool as normal. Pressing and holding “Q” will instead activate the Speed Key’s special capabilities, enabling you to adjust the assigned slider using various methods mentioned above.
What is a HotKey?
A Hotkey is a designated key assigned to either increase or decrease a development slider by a specified amount.
Pressing Shift+Hotkey allows for an alternate, predefined adjustment amount.
*What is an Action Key?
An action key, when pressed, can perform one of the following four types of actions.
You can create as many Action Keys as you wish.
*Masking Preset & Masking Tool
You decide on a masking preset, along with a masking tool to be activated when this type of Action Key is pressed.
The available tools you can select to be activated with a masking preset (Dodge, Burn, Soften Skin, etc…)
-
Brush
-
Radial
-
Linear
-
Color Range
-
Luminance Range
-
AI Select Subject
-
AI Select Sky
-
AI Select Background
-
AI Select Object
-
AI Select People
Develop Preset
Apply any of your develop presets that are available in Lightroom
Keyboard Shortcut
List of the available shortcuts…
-
Copy
-
Paste
-
Copy Previous
-
Match Total Exposures
-
Sync Images (with prompt)
-
Sync Images (no prompt)
-
Enable Auto Sync
-
Export selected photo(s)
-
Export with previous settings
-
Select Tone Curve Targeted Adjustment tool
-
Select Hue Targeted Adjustment tool
-
Select Saturation Targeted Adjustment tool
-
Select Luminance Targeted Adjustment tool
-
Select Grayscale Targeted Adjustment tool
-
Deselect Targeted Adjustment tool
-
Open/Close Masking
-
Invert Mask
-
Toggle Object Aware
-
Toggle Generative AI
-
Toggle Before/After
-
Before/After – Split View
-
White Balance Tool
-
Crop Tool
-
Spot Removal
-
Brush Tool
-
Linear Gradient Tool
-
Radial Gradient Tool
-
Show Clipping
-
Convert to grayscale
Lr Commands
-
Previous / Next Photo
-
Flag as Pick
-
Flag as Reject
-
Remove Flag
-
Undo / Redo
-
Auto Tone
-
Reset Crop
-
Reset Image
-
Virtual Copy
-
White Balance
-
Auto White Balance
-
As Shot
-
Cloudy
-
Daylight
-
Flash
-
Fluorescent
-
Shade
-
Tungsten
-
-
Views
-
Library Loupe View
-
Grip View
-
Compare View
-
Survey View
-
People View
-
Develop Loupe View
-
Before/After – Left/Right
-
Before/After – Top/Bottom
-
Before View
-
Reference – Left/Right
-
Reference – Top/Bottom
-
-
Zoom
-
Toggle Zoom View
-
Zoom In
-
Zoom Out
-
Zoom 100%
-
-
Cropping
-
Original Crop Ratio
-
As Shot Crop Ratio
-
1 x 1
-
4 x 5 / 8 x 10
-
4 x 3
-
5 x 7
-
2 x 3 / 4 x 6
-
16 x 9
-
-
New AI Mask
-
Sky Mask
-
Subject Mask
-
Background Mask
-
Object Mask
-
People Mask
-
-
Star Rating
-
Set 0 – 5 Star Rating
-
Toggle 0 – 5 Star Rating
-
-
Color Flags
-
Set or Toggle Red Flag
-
Set or Toggle Yellow Flag
-
Set or Toggle Green Flag
-
Set or Toggle Blue Flag
-
Set or Toggle Purple Flag
-
Remove Flag
-
-
Toggle Lens Profile Corrections
-
Toggle Remove Chromatic Aberration
-
Perspective
-
Upright Off
-
Auto Upright
-
Full Upright
-
Level Upright
-
Vertical Upright
-
Guided Upright
-
*How are Action Keys different from Lightroom Shortcuts?
LrSK enhances standard keyboard shortcuts by introducing Action Keys, which allow you to create custom shortcuts for your favorite masking tools (brush, radial, linear gradient, AI Select Sky, AI Select Subject, or AI Select Background) along with your preferred masking presets.
For example, you can create an Action Key to darken the background from the subject. This Action Key will activate the AI Select Background masking tool and apply the burn preset, all with a single key press or key combination.
Another example is dodge and burn brushes. Press one key to activate the brush tool and select the dodge preset, and another key to activate the brush tool and select the burn preset. This functionality streamlines your workflow, making it more efficient and intuitive.
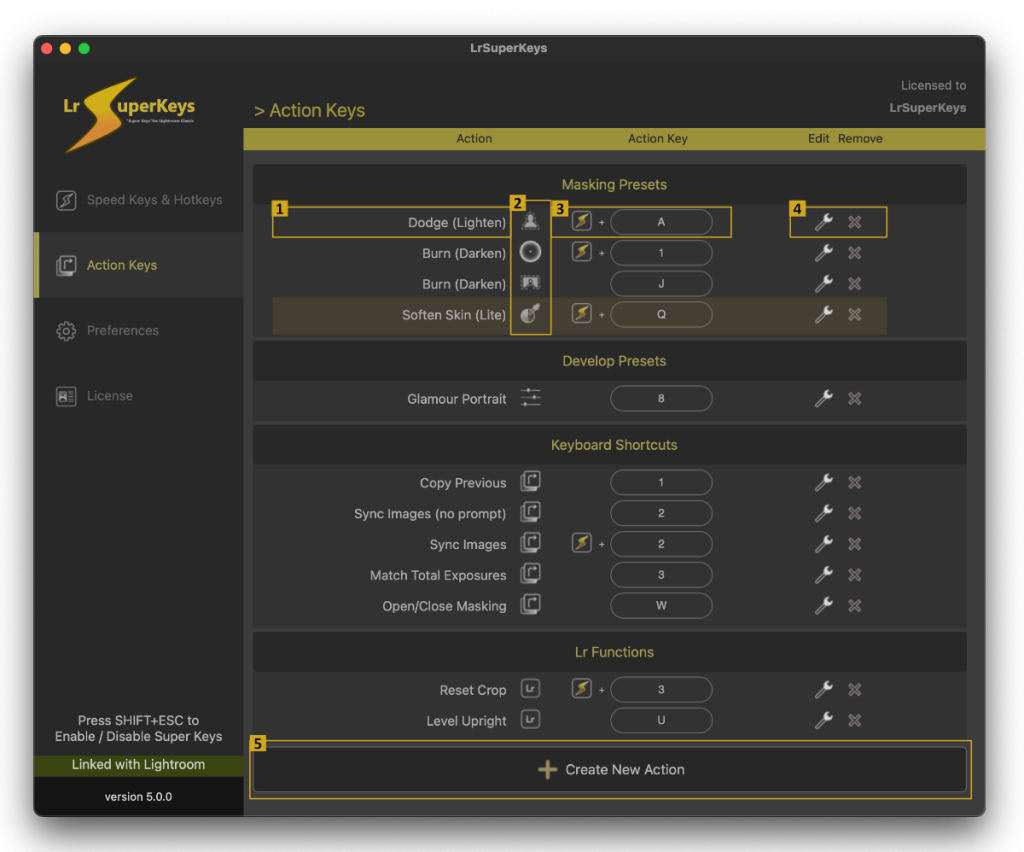
- If the Action is a masking preset, this section will display the name of the masking preset to be applied. Otherwise, it will display a description of the action.
- If the Action is a masking preset, an icon will indicate the mask tool. For example in the highlighted row. When the Actions Speed Key + Q keys are pressed, the color range tool will be activated and the Soften Skin (Lite) preset will be selected and or applied.
 Lightroom Keyboard shortcut
  Lightroom Command
 - Action Key – This is the key(s) to be pressed to apply the action.
This icon indicates that the Actions Speed Key must be pressed in combination with the action key. (Default is the Tilde Key “~”)
 - Edit and remove Action Keys.
- Click here to add a new action to your list.
How does using LRSK Actions Keys improve my workflow?
A common task in our workflow is to slightly brighten our subjects to make them stand out from the background. To achieve this, we have created an Action Key combination “~” + “A”. When this combination is pressed, Lightroom automatically selects the Subject and applies the Dodge (Lighten) preset.
This setup significantly reduces the number of mouse clicks and the time spent searching through the masking preset list. By streamlining our workflow, it allows us to focus more on the creative aspects of editing and less on repetitive tasks, ultimately reducing our overall editing time in Lightroom.
What is the Speed Menu and what are all the buttons for?
The Speed Menu provides you with quick access to your favorite masking presets and masking tools at the press of a button.
For instance, if you want to use the “Soften Skin” on your portrait. We simply click on the “color range” button in the “Soften Skin” row.
With a single click, Lightroom will create a new mask, select the color range tool, then select the “Soften Skin” masking effect.
Now with the color range tool already activate, simply select the color range on the subject’s skin to complete your action.
Here are some details on each section of the Speed Menu.
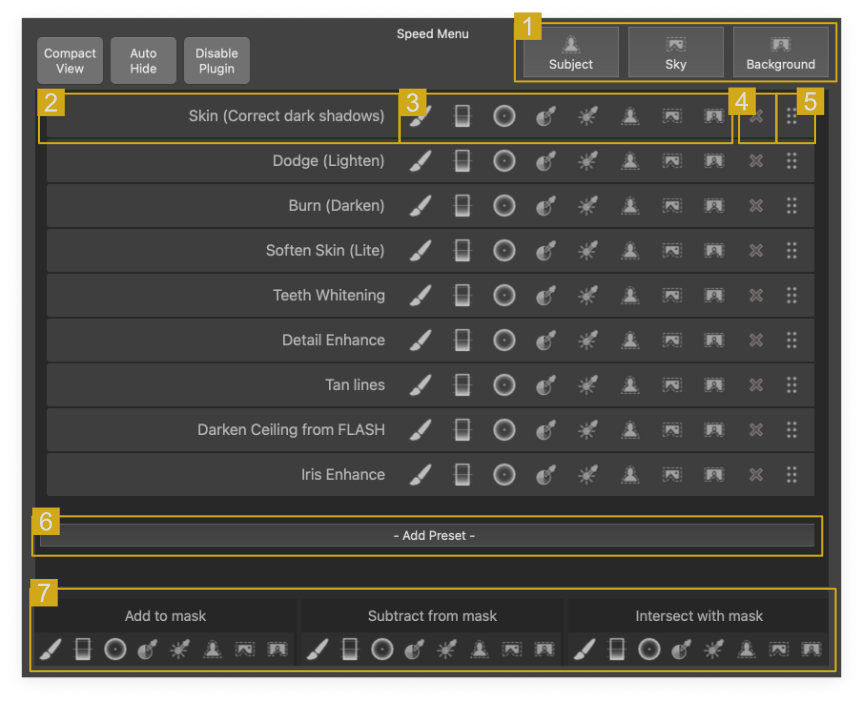
- Quick access buttons for Select Subject, Select Sky, and Select Background AI.
This will create a new masking layer. - A button displaying the masking effect preset name with two actions. If the masking tool is currently active in Lightroom, Lightroom will apply the masking effect preset you clicked on. If the masking tool is not active, Lightroom will create a new masking layer, select the masking effect preset and activate the brush tool for you.
- When you click on one of these buttons, Lightroom creates a new masking layer, selects the masking tool you clicked on (ie: Brush, Radial Gradient, etc…), and then activates the selected masking effect preset (ie: Dodge, Burn, etc…)
From left to right the tools are; Bush, Linear Gradient, Radial Gradient, Color Range, Luminance Range, Select Subject AI, Select Sky AI, and Select Background AI. - Remove the masking effect preset from the Speed Menu
- A handle for sorting your masking effects by clicking and dragging.
- Add a masking effect preset to the Speed Menu.
- Quick access buttons for manipulating the active mask.
How do I reposition the HUD (Heads Up Display)?
First, uncheck the “Auto-hide Heads Up Display” on the main application if it is not already unchecked.
Now click and drag on the top bar to reposition it.
You may choose to re-enable “Auto-hide” to have the HUD visible only when a Speed Key is being pressed.
How do I reposition the Speed Menu?
To move the Speed Menu, it must be visible first by pressing the assigned Speed Menu Key or unchecking “Auto-hide Speed Menu” on the main application.
With the Speed Menu visible, click and drag on the top bar to reposition it.
How to manually install Lightroom plug-in
If you have downloaded the zip file containing the Lightroom plugin folder you can either extract it to the default Lightroom Plug folder or use the Plug-in Manager to add the plugin to Lightroom.
What operating systems does LrSK Support?
LrSK supports both Microsoft Windows and macOS.